Bluetooth Speaker

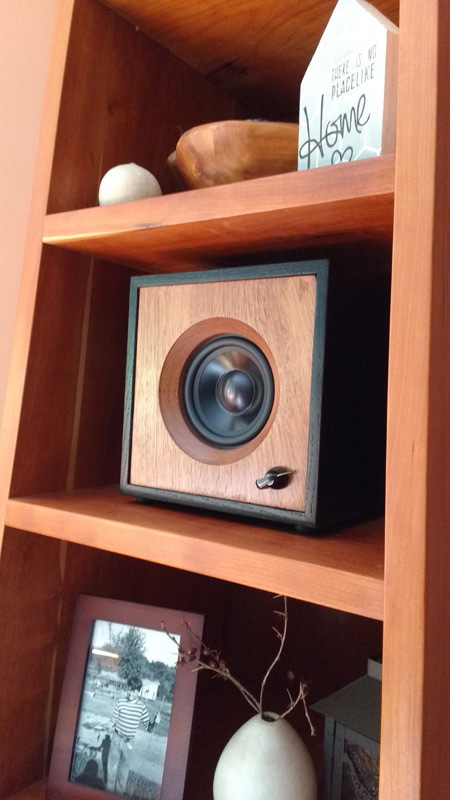
After shopping for a bluetooth speaker lately and being somewhat shocked with the prices of anything better than a toy, I decided to try building my own. This one is made of oak and mahogany, and has a 4 inch full-range driver. I found an off-the-shelf little board (for around $20 or so) that handles all of the bluetooth details. It sounds great. The range is a little low, but that may have to do with having to receive through 3/4 of a inch of red oak. I can probably only get around 10 feet away and still have it work - but I can live with that. We put it on this shelf in our living room. It really looks pretty nice over there.

Neopixel Mood Lamp

I built one of these Neopixel-based mood lamps for my desk at work, and another for my sister for her birthday. The three dials use the HSV (hue, saturation, value) model of light - each dial controls one aspect. It's a much more natural light model for humans to grasp than a standard RGB (red, green, blue) model. The wood is cherry, and the diffuser is just sanded plexiglass.

<

Laser Engraver – Take 2

This is take two of the laser engraver, rebuilt from the ground up. The old one used to bind up a lot on the x axis, and had a limited work area. With this one, I've used what I learned on the CNC machine to rebuild it. This one is far more reliable, and doesn't seem to have any binding issues at all. I've also hidden away all of the wiring this time, and included a control panel with an emergency stop button, control for each of the (two) fans, and a laser override button, so I can force the laser off when necessary.

NTU countdown clock

We've got a joke with a buddy of mine at work - he once claimed that some task would only take 15 minutes (an unrealistically short time for pretty much any software development task), that we started joking that all of his tasks would take some multiple of an NTU - Nick Time Unit. A month or two later, I was looking for something fun to make that would let me mess around with neopixels again. So I built this NTU countdown clock. The button on the left adds NTUs, and the button on the right clears the counter. As the time counts down the color will progressively move towards red, and when the timer expires all of the neopixels will blink red to alert the user. I love those illuminated arcade buttons on the top - they make a nice solid click when you push them.

PiGrrl Zero

Sean and I just finished building a Raspberry Pi-based handheld emulator system, than can play any classic video games up through the SNES/Genesis era. It came out pretty good, but it took three times to get case printed correctly. The stock case STL files from Adafruit were just not big enough - I had to scale things up in height to get all the components to fit. Eventually I'm hoping to mill (on the CNC machine) a replacement case from some exotic wood, and made some wooden buttons as well. That would look pretty sweet.

Fibonacci Clock

I saw a cool idea for a clock on a Kickstarter, and decided to build my own. The idea is that the clock shows the Fibonacci sequence (as high as 5, at least), and you tell the time based on which cells are lit up which colors. The sequence - starting with the smallest cells and increasing from there - goes 1, 1, 2, 3, 5. You figure out the hours by adding up the values of any cells colored green. You figure out the minutes by adding up the values of any cells colored blue and multiplying by 5 (giving the clock a 5-minute resolution). If a cell is colored red, it should be counted in the sums for both hours and minutes. I really like it - it's got a very art deco feel to it.

Learning to Solder

Two weeks ago Sean begged me to teach him to solder. I had been saying that I would teach him soon, as I felt he was finally old enough. He's been really excited about getting some littlebits for Xmas - and littlebits publishes all their schematics online, so that you can built your own bits to add to any kits you buy from them. That seemed like a really good first project for him, because it only required a few parts but would actually be useful once it was complete - instead of the normal "throwaway" first soldering project most people start with. It came out really good! He's got a very steady hand, surprisingly.

Sean’s VR Headset, v1

Sean has been really excited about VR all year, and a while ago he tried putting together his own VR headset using his tablet, some 3x magnification reading glasses, foamboard, elastic waistband, and hot glue. He's played around with both VR apps from the Google Play store, and he's tried tethering it to the PC to use as an external display - don't ask me how, as he's figured all of this out on his own! Dang! It works pretty well, so far. He's still got to figure out a good head tracking solution - the tablet's built-in accelerometer only works so-so. And the other problem is the lenses - the focal distance on the reading glasses is just too long to get both eye's images to resolve down to one 3D image. He's got some new lenses coming in the mail tomorrow though, so hopefully you'll soon see v2 here!

Christmas Countdown

Years ago I painted one wall of Sean's room with whiteboard paint. One thing we do every December is count down the days until Christmas on his whiteboard in a unique way. In previous years we've drawn a tree and filled in one ornament per night, or filled in a string of lights in a different color each night - stuff like that. This year we drew a bunch of blank snowman bodies, and finished one per night until Christmas Eve.

CNC Machine – Part 5: First Test

This weekend I finished wiring up the CNC machine and was able to get a first test going. The limit switches aren't hooked up yet - I was getting some noise on those lines (they are unshielded, pretty long, and run right near the stepper motor cables), and was getting a lot of "false positive" limit alarms. So I've got to be extra careful until they are fixed - but I couldn't resist trying to make something. Right now I'm really working in 2D - I'm just using the same software workflow I use for the laser engraver. But next weekend I hope to start messing around with some other CAD/CAM software to try something more substantial!