Minecraft Nightlight

I built a pair of Minecraft block night lights - one for Sean, and one for my nephew Ryan. It's modeled on an ore block, an the colored sections that would determine what type of ore it is are cut out and filled with frosted plexiglass. A set of remote-controlled under-cabinet lights are mounted inside, and all of the different colors can simulate all the types of Minecraft ore. As a nightlight it's a little too bright for sleeping, but the remote has a brightness setting that lets you throttle it down. I got the idea from this site.

CNC Machine – Part 4

I didn't get as far this weekend as I had hoped too - I've got most things wired up, but I still need to make patch cables for the motors and limit switches. The Arduino is programmed and I tested the spindle on/off control by plugging a fan into the relay-controlled outlet. So probably only a couple more hours of work before I can test that each of the axes moves. After that it's just a little axis tuning, and getting my software workflow figured out.

CNC Machine – Part 3

I really intended to post a lot more intermediate steps from the build - but I got caught up in the build itself, and forgot to document it. So in these pics the physical build of the machine is all done - but it still needs the electronics wired up, and will probably need some tuning of the axes. Along the way I also decided to build a whole new stand, which will have an integrated toolbox and shelves and such for holding stock - the stand is structurally complete, but I still need to wrap the sides in some nice birch plywood and trim everything out with hardwood to hide that cheap framing lumber. I had to order a few loose ends tonight before I can start wiring everything - so hopefully it will all come before next weekend so I can get started on the wiring!

CNC Machine – Part 2

Last weekend I added the X-axis rails to the machine, which turned out to not be too bad. Next up is the gantry - which I've already started but don't have pictures of yet.

CNC Machine – Part 1

Started the CNC machine this week - so far I've got the rolling base and the table bed complete. The stand is built so that the bed (and the machine attached to it) can be pivoted down into the body of the stand, so that it takes up less space when stored - and also that it can fit through standard interior doorways. Next up are the X-axis rails, which are built from black iron gas pipe supported on 2x4s - I'm guessing getting them exactly parallel will be the tricky part.

Next Project – CNC Machine

The next project I plan to tackle is a CNC machine, with a trim router as the cutter head. The laser engraver that I built last year was a sort of "trial run" for this project, as the laser engraver was smaller scale and cheaper, and only had two axes (compared to the three that the CNC machine will have). The plans I am following come from Solsylva, and are quite detailed. Excited to get started!

Lego Mindstorms

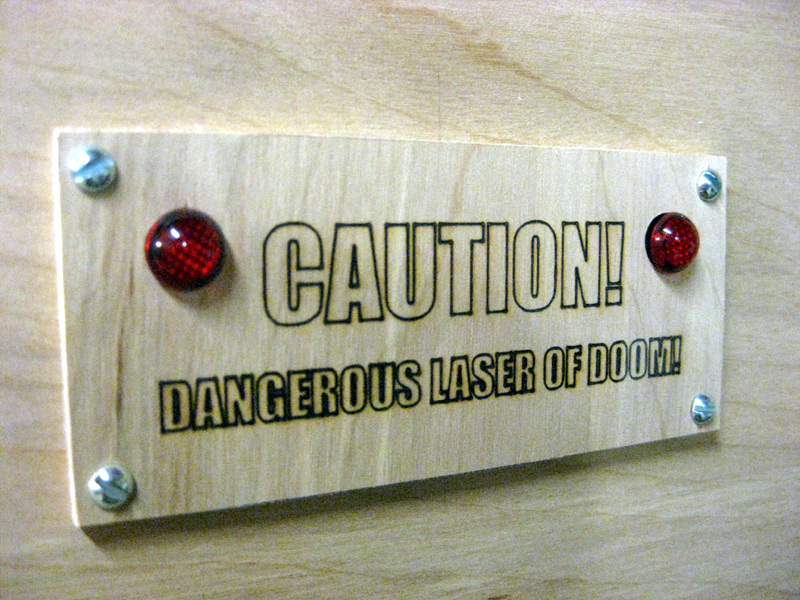
Sean and I had a deal - if he saved up half the money for a Lego Mindstorms robotics set, we would pay the other half. Surprisingly, he did it! Which is strange because the joke is that whenever he has two nickels to rub together, he spends them. But somehow he did it. He was in a summer camp this year (and one last year) that was based around Lego Mindstorms, so he knew what he was getting into and couldn't wait to have his own set. He's been building all kinds of stuff ever since it arrived. The picture here is what he calls the R-Pet v2.0 ('R-Pet', as in 'Robotic Pet'). It can play fetch, detect different colors and has a 'favorite' color, wag its tail, respond to touch (pat it too many times and it will growl), and dance. He's been brainstorming what to add to it next!

Laser Engraver Anti-Blindness Shield

While noodling around with my laser engraver to make the front panel for the photobooth enclosure, I finally got to the point where the old shoebox I tacked up in front of it to prevent people from going blind just didn't seem good enough. So I made a wooden drop-down shield to block the view, and laser-engraved this little plaque for the front of the shield. They aren't wired up yet, but the idea is that the two red lamps will be lit up when the engraver is running.


RPi Photobooth – Mark 2

For this year's Father's Day cookout, I rebuilt the Raspberry Pi Photobooth from the ground up. This time I built a nicer enclosure too - one with a laser engraved front panel (using my homebuilt laser engraver!) and the RPi camera module. It worked out great - it was light enough to mount on a tripod, which made the whole thing a bit more functional and polished. Soon I plan to post a bunch of the photos we captured with it!


Color Organ

Started experimenting with the Adafruit Trinket, and their RGB Neopixels. I'm starting with one of their example projects - a color organ using a Trinket, a few Neopixels, and a small microphone with integrated AGC. Once it's working, I think I may put it inside the Pandora radio to add a little bling to that project.